Hello Kitty & Black Cat Pumpkins

This year we don’t have a traditional jack-o-lantern. We have Hello Kitty and a black cat with glowing eyes! I didn’t take step-by-step pictures with these, but they’re very simple and self-explanatory. You can see in the pictures how to do any of the steps listed.

Hello Kitty

What you will need:

  • Oval, squatty pumpkin
  • Small witch’s hat (usually has headband attached ~ if it does, just remove the headband)
  • Foam sheets in white, black, and yellow
  • White spray paint
  • Craft glue or hot glue
  • Toothpicks
  • Clothespins or paper clips
  • Small tack nails and hammer (optional)
  • Thick black wire (optional ~ not pictured)

What to do:

  1. Spray paint the entire pumpkin and let dry completely.
  2. Cut one triangular ear shape from the white foam, two oval eyes with lashes from the black foam, and one oval for the nose from the yellow.
  3. Before gluing, hold the face pieces up to the pumpkin to determine the best locations for each. Remember that the bottom of Hello Kitty’s eyes are about even with the top of her nose, and her eyes are widely spaced. Glue in appropriate locations.
  4. For the ear, you’ll need to bend it in the bottom center. Arrange the ear on the pumpkin so the bottom is flush against the gourd. Press one toothpick in on each side to support the ear but so that they are not visible from the front. (As pictured, you cannot see the toothpicks behind the ear giving it its shape.) Glue the ear to the toothpicks. You may need to use clothespins or paper clips to hold it in place until the glue dries. Once it dries, remove whatever you used to hold the ear to the toothpicks.
  5. For the hat, put a line of glue around the seam between the cone and brim and place it on the pumpkin. If it does not sit well, or if you want to be sure the hat does not fly away in the wind, you may want to use small tack nails to secure it in place. These also work well if the brim will not sit just how you want it. Just tap the nail gently through the brim and into the pumpkin.
  6. If you want to add her whiskers (not shown), cut six short pieces of heavy black wire (pieces of clothes hanger painted black will work, too). Insert three on each side near the outer edges of the face as Hello Kitty’s whiskers are drawn almost on the sides of her face rather than by her nose. The top whisker is about even with the top of her eye, the bottom whisker is about even with the bottom of her nose.

Tips & Variations:

  • Spray glitter would look cute over the white on the pumpkin.
  • You can paint her eyes, nose, and whiskers instead of cutting them from foam.
  • A small mask would look cute in place of the hat. You may need to place the second ear if you use a mask instead of the hat.
  • You can go with any costume theme for Hello Kitty!

Black Cat

What you will need:

  • Tall oval pumpkin
  • Short oval pumpkin small enough to proportionally stack on top of the tall pumpkin
  • Black spray paint
  • Paring knife
  • Metal spoon
  • Black foam sheet
  • Toothpicks or thin dowel rod cut into short pieces
  • Craft glue or hot glue
  • Clothespins or paper clips (optional)
  • Votive candle (traditional or battery-powered)

What to do:

  1. Spray paint both pumpkins black and let dry completely.
  2. Cut out the stem side of the smaller pumpkin just as if you were carving a jack-o-lantern. Discard the stem section. Scoop out the inside of the pumpkin and turn upside down (the hole needs to be on the bottom). Cut out two cat eyes.
  3. Set the smaller pumpkin on the top of the taller pumpkin. Make note of where the gourds meet. Insert toothpicks or dowels in the tall pumpkin where the smaller pumpkin touches. These will help the smaller pumpkin stay on the taller pumpkin. Set the votive candle on the top of the taller pumpkin, and press the smaller pumpkin down on top of the toothpicks/dowels.
  4. Cut two triangular ears and one curved tail from the foam sheet.
  5. Attach the ears as described above for the Hello Kitty pumpkin. Attach the tail on one side in a similar fashion.
  6. When it’s dark outside, light the candle and the eyes will glow.

Tips & Variations:

  • Spray paint plastic ear pieces from pumpkin decorating kits instead of making foam ears.
  • Add wire for whiskers.
  • Use your favorite method for preserving a carved pumpkin.
  • Add very small pumpkins (painted black) for feet.
  • Make one laying down. Instead of a tall oval pumpkin, choose a large short pumpkin and offset the “head” so that it looks like a cat laying down.

Pumpkin Centerpiece

This is a great decoration that will last through October and November. You can even spookify it for Halloween and then remove the ghoulish flare to make it Thanksgiving-worthy. It’s super quick, super easy, and looks fantastic as a centerpiece on your table, on the mantle, or on a side table.

What you will need:

  • Variety of pumpkins, gourds, leaves, and pinecones (it’s all really up to you–whatever you want to use)
  • Bowl or basket
  • Empty plastic container or piece of foam that fits in the bottom of the bowl

What to do:

1. Place the plastic container upside down into the bowl, or place the foam into the bowl if that’s what you are using.

2. Lay leaves facing out along the inside of the bowl. It’s great if the tips stick up above the edge, but they don’t have to. Their main purpose is to hide the container/foam.

3. Add pinecones between the leaves. I found it’s easiest to place them with the bottoms against the bowl with the tops pointing inward.

4. Arrange the pumpkins, gourds, leaves, and pinecones as desired. Just play with it and rearrange until you’re satisfied and all of the filler is covered.

Tips & Variations:

  • For the filler, the idea is just to use whatever you have on-hand. You could wad up paper towels, use an old rag or t-shirt, socks, whatever.
  • You can also do this with Christmas ornaments or Easter eggs.
  • Place a candle in the center. Never leave it lit while unattended.

Stocking Pumpkins

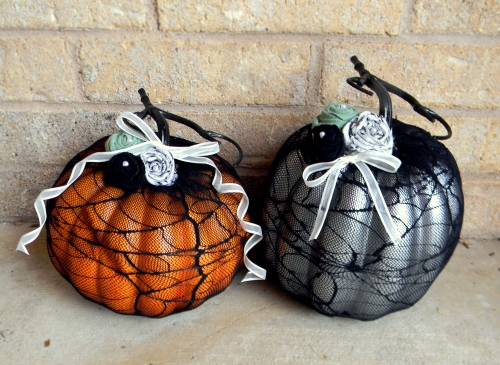
I’ve seen this idea floating around online and wanted to make my own. I want to reuse them year after year without having remake them, so I bought a couple of fake pumpkins to use instead of real ones. The instructions I give are how I did it; there are other ways to do this, but you still end up with the same result. Do whatever works best for you.

Stocking Pumpkins

~ Sorry! I don’t have step-by-step pictures for this. I made them a few days ago and only took pictures after I finished.

What you will need:

  • Pumpkins, real or fake (make sure they are a size that will fit into the legs of panty hose)
  • Panty hose with a design (lace, spider web, etc.)
  • Needle and black thread
  • Fabric rosettes (optional)
  • Ribbon (optional)
  • Hot glue gun (optional)
  • Paint (optional)

What to do:

  1. If desired, paint the stems of the pumpkins. I used oiled bronze spray paint because it was dark and I had it on hand. You could use acrylic paint, too. I found that using a plastic grocery bag with a little hole ripped in the bottom for the stem to go through worked very well to cover the pumpkin.
  2. Cut one full leg off of the panty hose. Turn the pumpkin upside down in your lap and push the panty hose over the whole pumpkin. This is a little tricky; it takes some finagling. Arrange it as desired. Tie a simple knot in the hose at the bottom.
  3. Thread your needle and use a gather stitch on the panty hose around the stem. (In case you don’t already know, a gather stitch is simply pushing the needle through, up and down, and then pulling the thread tight so that the fabric bunches up–or gathers.) You want the edge of the panty hose at the base of the stem. Tie off your thread, and trim any excess fabric away from the stem, if needed (be careful not to cut through your stitches!).
  4. If desired, hot glue fabric rosettes and ribbon to the pumpkin.

Tips & Variations:

  • Instead of tying a knot beneath the pumpkin, you can stitch it up. This lets it sit flat. If your pumpkin has room beneath or is heavy enough, this may not matter.
  • Spray paint the pumpkin before putting on the panty hose. (See my silver pumpkin in the picture above.)
  • Glue on glitter, buttons, or whatever odds and ends you may have. Just remember, less is more, so keep it simple; you already have a lot of visual interest going on with the stocking design, so anything you add should enhance that.

Quick & Easy Ghosts

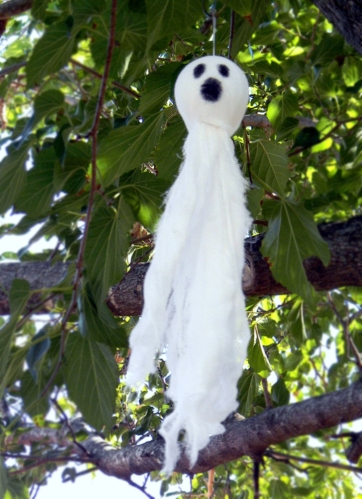
These cute ghosts are very quick and easy to make. In fact, my four-year-old helped me make some of them. We hung ours from the trees in our front yard, but you can hang them anywhere or even insert a stick into the bottom and stick them into whatever and have them “standing.”

Hanging Ghost

~ Sorry, I don’t have step-by-step pictures of this. I made these a few days ago and only took “after” pictures.

What you will need:

  • Styrofoam ball of desired size and number (one ball per ghost)
  • Cheesecloth
  • Black permanent marker or fabric paint
  • Needle and thread

What to do:

  1. You will need to cut the cheesecloth into sections. You want each to be long enough to extend well past both sides of the ball and leave room for tying (the ball will be in the middle of the section).
  2. Unfold each section until it is folded only once (leaving a double layer). Cut in half length-wise so that you have 2 double layer strips.
  3. Place the ball in the center of one strip. Tie the long ends in one simple knot. Turn the cloth and ball 1/4 turn and repeat with the other strip.
  4. Using the marker or paint, create a face for your ghost.
  5. Using the needle and thread through the very top of the ghost, create a hanging loop. Tie it off and cut the loose ends of thread. It’s ready to hang!

Tips & Variations:

  • For the bigger ghosts, I spray painted the balls with glow in the dark spray paint.
  • I like to use Sharpie markers so that it bleeds a little on the cheesecloth, leaving feathered edges on the eyes and mouth. I think this looks a little more spooky than the clean edges left by paint.
  • Instead of creating a hanging loop on top, insert a small dowel or similar object into the bottom before tying the knots (tie the knots around the dowel). You will be able to stick the ghost into a planter, vase, or otherwise enable it to “stand” rather than hang.
  • I used wire clothes hangers and bent them to hang the ghosts in our trees.